Tuesday, March 12, 2013

Bulk Head Glue Up

After cutting out the round top for the bulk head table I had to glue some of the boards back together.  The old tongue and groove boards had been painted so many times that I had too clean off the paint first before I could glue them back together.  I have a set of antique tongue and groove planes that I used to clean off the paint.  They were a perfect match to the old tongue and groove boards.  After I had cleaned off the paint I clamped the two halves of the top together.  I saved the cut out waste pieces from the routed circle and used them as clamping cauls.  The inside curve supports the curve of the top and the outside flat surface allows for  good clamping pressure.
I love how the top worked out and I love how the many layers of different colors of paint are exposed.
It looks awesome. I'll drill some holes through the top stretches to attach the top.


Monday, March 11, 2013

Bulk Head Tops

Yesterday I made a simple circle jig out of a piece of 1/2 inch plywood.  I drilled a hole in it for the router bit and measured 13 Inches from the edge of the bit.  The diameter of the table top is 26 inches.  I drilled a hole at the 13 inch point and put a screw and washer through it.
I used the jig to cut a circular piece out of the old bulk head door. I made multiple passes, increasing the dept of cut slowly so I wouldn't chip the old boards. The piece will be the top for the table. I need to make a second top.  The old tongue and groove boards needed a little glue to keep them together, other than that everything worked well.


Sunday, March 10, 2013

Bulk Head Tables Continued

Yesterday afternoon I started working on a second bulk head table.  The tops will be made from a bulk head door I took off of my friend Patt's house.  I replaced his door.  He was going to throw the door out so I kept it.  I originally only going to make one door and keep the original handle and hardware as part of the top but I had enough material to make a second.  The door is made up of tongue and groove pine boards that have been painted over and over, creating  wonderful patterns and patina.  The door is large enough to get two round table tops out of.
I used two 29 inch long 4" x 4" post for the table base.  I notched ( cut a rabbet) around the top and bottom of the post to accommodate the feet and the top stretchers of the table.  The top stretchers are 3 inches wide and 11 inches long and the feet are 3 1/2 inches wide and 13 inches long.  I'm trying to use whatever off cuts and scraps I have around the studio too make the table out of.  The table base will then be distressed and painted. I added a stop chamfer on the post.  In old days they called this detail wagon beveling


Monday, March 4, 2013

Material Needs

Last Friday I was notified by Arts Worcester that I had received a 'Material Needs' grant. For a few years now I've had an idea to create and build two round, barrel shaped side tables.  The tables will have cherry tops and the bodies will  be covered with copper sheets creating a copper brick pattern. I've had sketches of these tables in my sketch book for years now, the bottom, or feet of the table were never resolved. 
 I was driving down a road in New Jersey one day and spotted two swivel, recliner chairs by the road side with a 'Free' sign on them.  I pulled over and had a look at the chairs.  The base and feet of the chairs were made up of a swivel base that had 1960's style torpedo legs attached.  I knew what I was going to do with these chairs.  Luckily I had some tools with me.  I turned the chairs over and took the swivel mechanisms off.  My table idea was now resolved.  I will use these bases for my table bases.  The copper and cherry will work well with them and the tables will swivel.  I haven't been able to create these tables because of the cost of materials, until now.  I proposed my idea to the  grant committee at Arts Worcester and I received a 'Material Needs" grant to purchase the materials and create the tables.  I have to the Fall to complete the tables and then they will be showcased in an exhibition at Arts Worcester in the spring of 2014.
Below are the bases I took off the chairs in New Jersey.  They've been hanging from the ceiling for  few years now.


Bird Houses

If you have a toddler in the house and are looking for something to do with them try making a bird house or two with them.  A few pieces of wood and some glue and nails and you have all you need to have hours of fun with them.  Yesterday my son Quinn and I made three bird houses and a bird feeder.  It was a great day.  we both had fun and we made functional bird houses that we then went and hung on the trees in our yard.
Being creative with your kids gives you a wonderful opportunity to find out what's going on in their lives and how they are feeling about things.  While they are building they are usually chatting away about their world.  It's awesome'  Here are a few images of the fruits of our labor.


Thursday, February 28, 2013

Monitor

Yesterday I stopped making the table and starting working on a project for my friend Jeff.  Jeff works for a local cable TV station and need a monitor made for a camera.  The base of the monitor fits onto a tripod.  The hole at the back is where the camera comes through.  A piece of glass fits into tracks at the front.  Even though this looks simple it was challenging to get the angles correct.


Wednesday, February 27, 2013

Bulk Head Table

Yesterday I started working on a table project.  I'm trying to use some leftover pieces from other projects in this table project.  The fir post is fro a bed project.  The pine boards are from a pile of fire wood I got from my neighbor and the old painted door is from my friends bulk head.  I made a new door fro him and kept the old one.  I'm going to cut a round top out of the door.


Wednesday, February 20, 2013

Cultural Council


Today I was at the Uxbridge Town Hall reading an oath and getting sworn in as a new appointed member of the Uxbridge Cultural Council.  I'm very excited about the position and the opportunity to work with other council members.  The term is for three years.


Tuesday, February 19, 2013

Sherwood number one

Below is an image of a table I designed and made in my second year at Sheridan College.  The table is made out of solid walnut and walnut veneer.  The curved door was made using wacky wood plywood and walnut veneer bent over a form and laminated using a vacuum press.  The solid walnut panels are joined together using biscuit joints and bed fasteners to accommodate for wood movement.
The legs are and shelf supports are made out of solid aluminum rod.
The shelves are suspended as is the small drawer inside the cabinet.  I've made this table five other times for different exhibitions.  I was lucky enough to get the table published in the spring 2000 edition of Canadian House and Home magazine.


Pyramid Candles

My brother Mike has always been my biggest fan and advocate.  When I was visiting him last week I spotted this pyramid candle he has that I made more than twelve years ago.  The base of the candle is made out of solid cherry with aluminum tubing.  The cherry stock is laminated together to form a block measuring approximately five inches square.  I then drill two inch and a half diameter holes on two sides of the block and insert inch and a half aluminum tubes. I then tilt the band saw table to ten degrees and cut off four sides, cutting through the wood and aluminum, creating a pyramid.  All sides are sanded.  The aluminum holds two tea light candles perfectly.  I finish the candles with an oil finish.


My First

Last week I was in Toronto visiting my family.  When I was at my brothers I took these photos of his kitchen.  This was the first kitchen I made.  It is a colonial style kitchen made out of solid oak, with raised panel doors that have a natural finish on them.  I was living in a basement apartment at the time and did all of the woodworking in my living room.  The door, drawer pulls and hinges are made out of brass with an antique finish.  It was nice to see that after twenty years it still looks like new. 


Tuesday, February 5, 2013


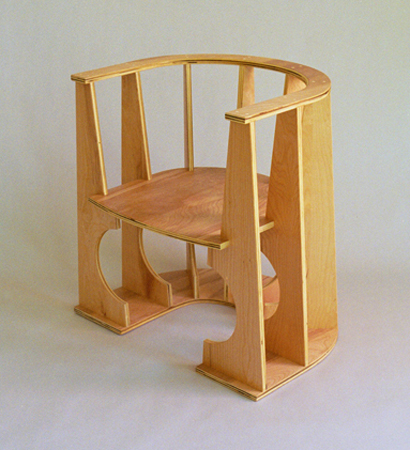
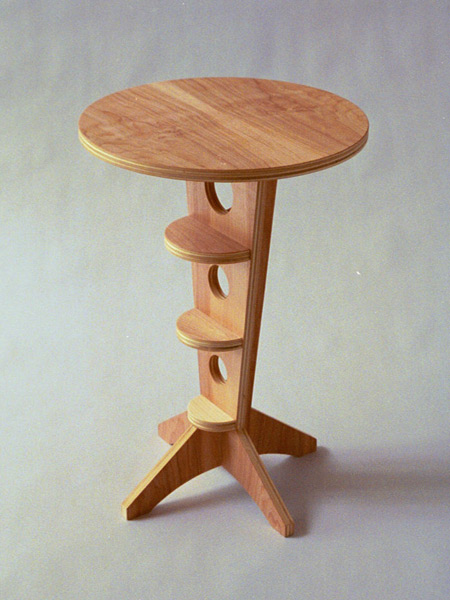
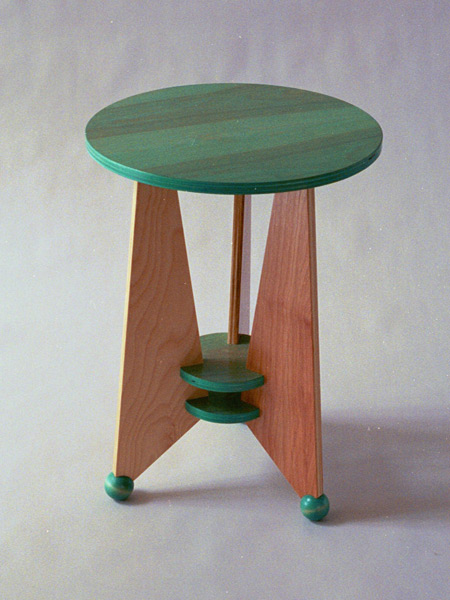
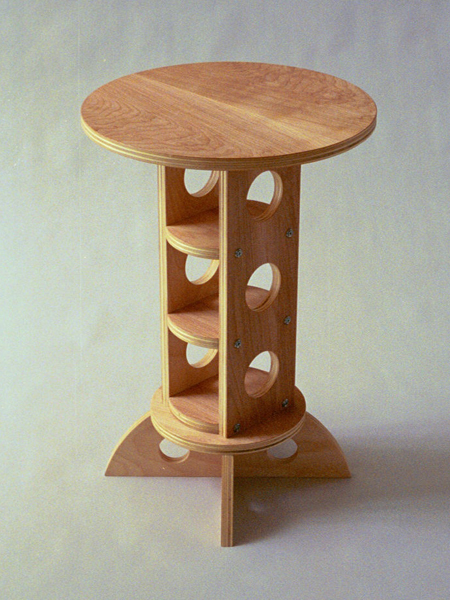
The plywood furniture book is coming along nicely.
Below are a few images of pieces that are in the book.

circular shaped throne chair

Aero End Table

Astro End Table

Stoplight End Table


Very Beginning Woodworking


Yesterday afternoon I taught a children's woodworking class at the Eliot School in Jamaica Plain, Mass.
The kids were elementary school age.  I had a blast.  It felt great to teach again.  I'll be there again next week.
The school is small but the wood shop is well equip.  Below are a few images of the wood shop.